Basic scanning on the Zeiss 510 meta Confocal
Powering Up the Zeiss LSM 510 Meta Confocal
- Remove dust cover gently from microscope
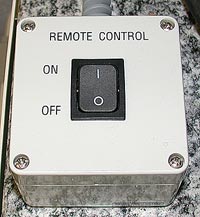
- Switch on mercury arc lamp (HBO) - before turning on
"Remote Control" switch
- Lamp must be cold before starting. Carefully feel
temperature of lamp housing. If even slightly warm allow time for it
to finish cooling.
- If conventional fluorescence is not required there is no
need to turn on the HBO lamp
- N.B. Arc lamp startup produces large electrical
transients which can damage confocal and microscope electronics if running.
Remote Control should be off before turning on arc lamp.
- Let lamp strike (about 15-30 seconds) and ensure light is
not flickering.
- If green "LAMP" light does not turn on,
the lamp has not ignited. Turn switch off and wait 10 seconds before
turning back on.
- If HBO hours are greater than 350 hours please inform facility staff and/or
put a note in the log book
- Ensure that anti vibration table is floating. Check Nitrogen tank
pressure, which should be greater than 40 p.s.i. (and less then 80 p.s.i.)
- Switch on "Remote Control" switch (near/on laser table)
- Computer and LCD monitors should be on. If not, switch on.
- Plug in stage heater & objective heater if they are going to be used
Starting the 510 software. (N.B. LSM 510 software
must be running to use the Axiovert 200 microscope)

- A small black window will appear. You can minimize it if you
like, but do not close it.
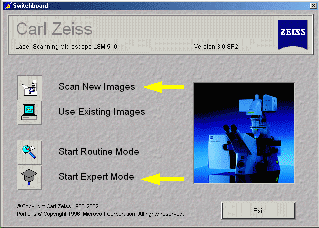
- Choose "Scan New Images"
- Start Expert Mode

Turn on the Lasers
- Select Acquire in the Expert Mode window
(see figure above)
- Press Laser button - Start only laser(s) required for fluorophores used
in your sample
- If Argon laser 458, 488, 514 nm (blue excitation for FITC, GFP, YFP,
Bodipy, CY2, etc.) has been off:
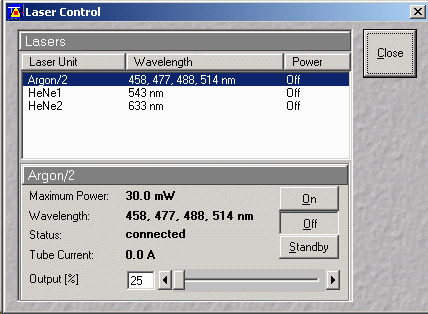
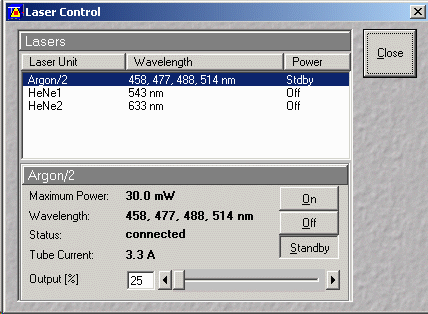
- Select Laser unit Argon/2
(see figure below)
- first go to standby and wait until the text says "Ready"
- then click on "on"
- set Output (%) to between 40% and 50% (unless more power is
required for FRAP experiments, e.g. ~90%)
- If using the 458 nm line then set output to 60% to 80% (CFP)
- Running at high Output (%) is generally not
necessary
- check that current does not go above 8.1 Amps
- reduce power if current goes beyond 8.1 Amps
- If HeNe1 543 nm laser (green excitation for Rhodamine, Texas Red, CY3,
Alexa 543/568, etc.):
- Select Laser unit HeNe1 543 nm
- click on On
- If HeNe2 633 nm laser (red excitation for CY5, Alexa 633, etc.):
- Select Laser unit HeNe2 633 nm
- click on On
- If laser is already on and is not required turn it off.
Controlling the microscope for viewing by eye (Widefield)
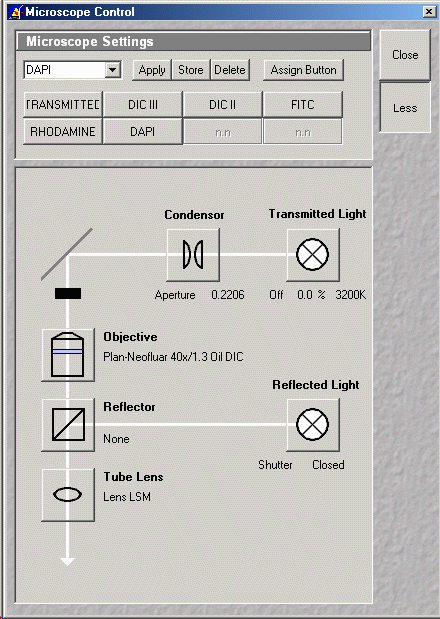
- Press VIS (activates controls in Microscope Control window)
- Press Micro
- Select viewing mode: transmitted or FITC or Rhodamine or DIC III etc. as
required
- N.B. If these buttons are blank please make arrangements
to have the registry entries installed with facility personnel
- Objectives can be changed using the software
- For DIC, ensure that polarizer on top of the condenser is
orientated with the thin silver handle to the left (0 degrees)
- More information on DIC imaging can be found later in this user
guide
- Focus on sample
- Find location
- Check fluorescence
Setup Scanning Configuration - Choosing filters for
fluorophores in sample
- Press "Config" button (see figure above)
- For standard Photo Multiplier Tube (PMT) detection select "Channel Mode"
button
- For single fluorescence channel detection or simultaneous double channel
detection choose "single Track" button
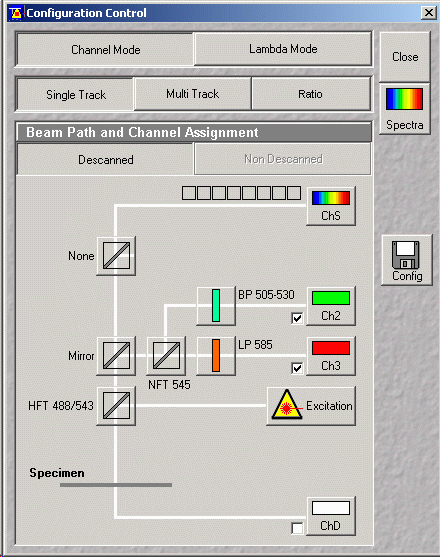
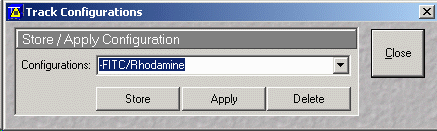
- Important! Choose a configuration by pressing the "config" button

- From the Track Configuration window pull down the configurations - Choose
an appropriate configuration. e.g. for FITC/Rhodamine (2 channel)
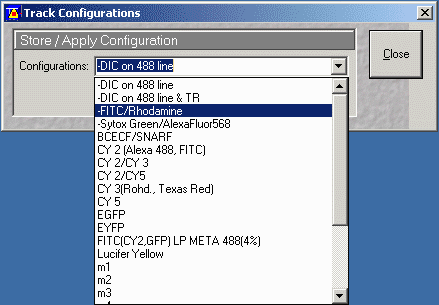
- It is important to press Apply to enable filter settings
- Note that it is possible to manually set the filters. This is best
done by experienced users.
- For sequential multi-channel detection select "Multi Track" button
- There are many additional scanning options. Instructions can be
found in the Other Imaging
Configurations and Techniques section of this manual.
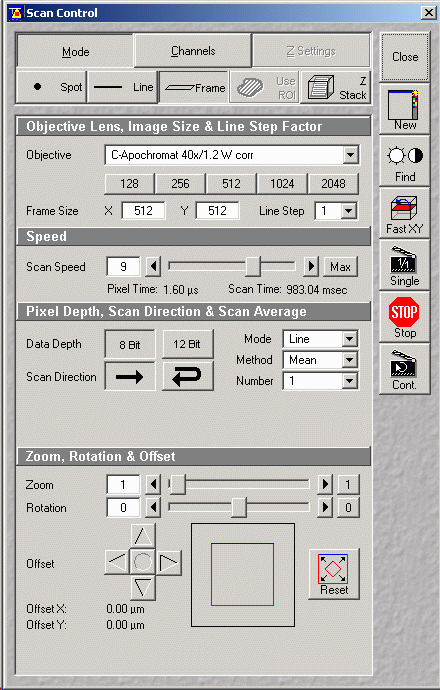
Setting Up Scan Controls - Controlling scanning & detection
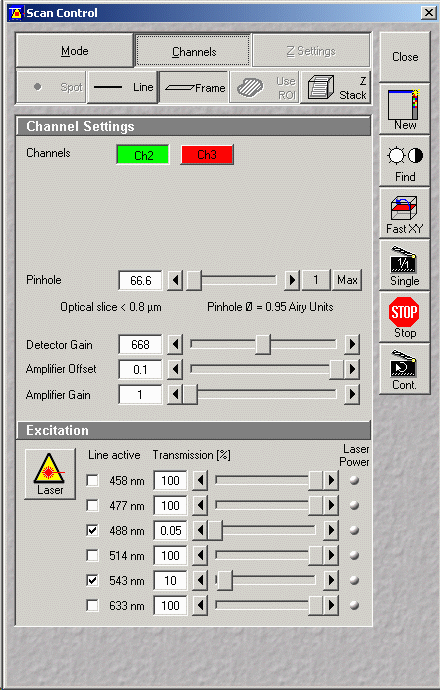
- Press "Scan" button from Expert Mode Window (just above)
- Choose "Mode" button (see figure below)
- Select "Frame" (from spot - line -frame)
- Choose frame size (pixel dimensions, e.g. 512x512 or
1024x1024)
- Scan speed (leave at default for now)
- Pixel depth (8 bit)
- Mode choose "Line" or "Frame" averaging (either)
- Method (Mean)
- Number (typically 2 or 4, but depends on amount of noise)
Finishing up / Shutting down
ALL USERS MUST FOLLOW SHUT DOWN PROCEDURES CAREFULLY AND COMPLETELY
- Select Argon/2 laser unit from the Laser control window
- Set Argon/2 laser Output (%) to minimum (25%)
- Select "Standby"
- If another user is arriving in the next hour or so (see
booking page) lasers may be left running.
If another user is not arriving select Off for all lasers.
- Leave the Remote Control switch
on
- Laser fans will run for about 5 minutes then turn off automatically (a
reduction in fan noise will be noticed)
- Clean up immersion lenses used with lens tissue only
- Blot glass lens element
- Rub metal barrel
- Clean up oil and fluids from stage
- Exit Zeiss software
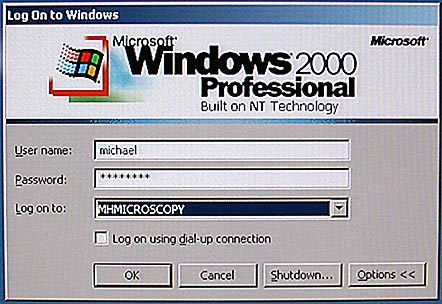
- Transfer data to e.g. \\MINSKY\USERS2 (MHMICROSCOPY
server) or USB key drive or burn CD, etc.
- Log off Windows with "Start" ---> "Shut Down" ---> "logoff
username"
- NOTE: Charges are based on Windows logon/ logoff. If you
forget to log off, you will be charged for that time
- Once laser fans have become quiet (automatically powered down) turn
Remote Control switch off
- Switch off Mercury Arc lamp
- Replace microscope dust cover, but avoid covering the hot HBO lamp
- Put all used disposable paper products, cans, wrappers, etc. into trash
can
The last user that was booked or using the system is responsible for ensuring
the system is shutdown. If you are the last booked user and have cancelled on the same day then
you must ensure the system is shut down:
- 1.
contact previous user, or
- 2. Ask another trained user in your lab to check for you
- 3.
call the facility to ensure system has been shut down, or
- 4. come over to facility to ensure system is shut down
yourself.
Other Imaging
Configurations and Techniques
For specific help with these scanning options please
make an appointment with facility
personnel
- DIC/transmitted light and single fluorescence
- Set up microscope:
- Focus on sample with objective used for imaging
- Set polarizer to 0 degree position
- Set Microscope Control to DICIII for 100x, 40x, etc. or DICII
for 10x etc.objective
- Set field aperture to minimum
- Adjust condenser focus until field aperture is in focus (N.B. may have
to move condenser off center to see edge)
- Open field aperture until it just fills the field of view
- Open condenser to maximum
- Adjust shear on objective Wallaston. (Set about midway and for
flat brick gray view. This view will have low contrast.
However contrast can be restored electronically when gain and offsets are
set.)
- For confocal scanning with DIC set condenser polarizer to 0 degrees
- Setup Zeiss 510 software for scanning with DIC
- In Laser control window, turn on Argon2 laser
- In the Config window:
- Select a Configuration that includes DIC and the
fluorophore(s) you are imaging
-- Contact facility personnel for help if you do not
have a pre-set configuration
- In the Scan window:
- Adjust Detector Gain and Amplifier Offset for ChD to get
desired contrast
- The DIC image will be acquired when you press Scan
- DIC/transmitted light and double channel fluorescence
- Sequential scanning (Multi-Track configuration)
- Sequential scanning with DIC/transmitted light
- Spectral detection (call Meta on the Zeiss)
- Sequential Meta with PMT detection
- Z-series stacks
- X-Z scanning
- Reflectance mode
- Photobleaching
- FRAP (Fluorescence Recovery After Photobleaching)
- FLIP (Fluorescence Loss In Photobleaching)
For specific help with these scanning options please ask facility
personnel
Got You's
- Trying to control confocal system when started in "view existing image"
mode
- HBO field diaphragm or aperture not fully open